Tuesday, July 30, 2013

TOASTED PECAN POTATO CHIP COOKIES . . . . . . Salty Sweet Deliciousness!

Visit the Mama Szasz website for more!

This recipe came simply out of need. Need for salty & sweet nummies, AND need to use up the crumbled up bottoms of the potato chip bags in my pantry. How many of you go to get the chips out of the cabinet, only to find this? ---------------------------------->
Not a single, dip-able chip in the house! Though, I can't really blame anyone for not wanting to use the chip bits that you're left with after eating most of the rest of the bag. Really, who wants to try to grab a pinch-full of little chip bits & try to slide them through the dip with the tips of your fingers, getting dip all over the place? (Though you know you've all done it)

So I came up with a recipe that will use these up. I suppose there's always Tuna Casserole to sprinkle them on, but I'm not looking for ordinary. These little puppies are so FABULOUS, you may want to take care when making them - make sure you have enough kids hanging around to eat some of them, so you won't end up gobbling up each & every one yourself!


TOASTED PECAN POTATO CHIP COOKIES


                                                      2 sticks Unsalted Butter - softened
                                                      3/4 cup packed Light Brown Sugar
                                                      3/4 cup Sugar
                                                     2 eggs
                                                     1 tsp. Vanilla
                                                     2 1/4 cups Flour
                                                     1 tsp. Baking Soda
                                                     1/2 tsp. Salt
                                                     4 cups Potato Chips - crushed & divided
                                                     1 cup Pecans - toasted & chopped
                                                    (I'm thinking next time maybe I'll add chocolate chips!)

(Simple directions are in BOLD print)
(more detailed directions are in plain print)

1.) Cream the butter & sugars.
OK, let's talk creaming butter & sugar: It's a simple step, but more important than it may seem. Creaming creates air pockets in a recipe batter. This causes the food to rise, giving an airy, delicate texture. It is the same principle as yeast making bread rise. Creaming produces cakes and desserts that aren't dense, but instead light and airy.

So start placing all the butter & sugars in a mixing bowl. Using a stand or hand held mixer, run it on medium speed just to get everything mixed. Then, scraping down the sides as necessary, keep the thing running until you see the mixture change color & become very "cream"-y.

"Mixed" Butter & Sugar

"Creamed" Butter & Sugar

2.) Add eggs, one at a time, mixing between additions.
Now turn the mixer down to low & add an egg. Wait til' the batter goes through the slippery, sloppy stage & gets sticky again, then add the other egg & mix until the batter is sticky again.

3.) Keep the mixer running & add vanilla, the flour slowly (about a 1/2 cup at a time, letting it mix in between additions), baking soda & salt.

4.) Hand mix in 2 cups of the potato chips & the pecans.


To toast the pecans, lay the whole nuts in a single layer on a piece of foil (or pan) & bake them at 400 for 4 minutes (a toaster oven works great), then chop them up.

 5.) Roll the batter into 2" balls & roll those in the remaining crushed potato chips.


6.) Bake at 375 for 8 to 10 minutes. Perfect cooking time for cookies varies from oven to oven, AND batch to batch. You have to test yours for a while until you get use to how it cooks. In mine, the first tray of cookies I put in takes 11 minutes, the rest take only 9 minutes. To test yours, set your timer for 7 minutes on the first batch, check them, & if they need more time just add 1 minute to the timer & check them again . . . Do this for each batch until you have a handle on your oven's timing.

The results you're looking for are a lightly golden edge, but still a soft looking center. Cooling them on the pan will solid-up the centers without making them hard to bite into.

Sunday, July 28, 2013

HAVE YOU EVER TRIED A NEW RECIPE . . . . . . . . . . . One that ended up on the back deck in flames?

Visit the Mama Szasz website for more!

OK, now for a little recipe BITCHING. I know most of you out there are just like me when it comes to being nicked by a new recipe that has you do something that is completely ridiculous! When I first started cooking, I had no idea what to look for in a recipe, so I'd try just about anything. And I'm not kidding, I would sometimes end up with rock hard Rice Krispie Treats (this because the recipe did not say "don't use fat free butter") or a flaming pork roast on the back deck (this because the recipe said, "place the roast on a rack", & it should have said, "place the roast on rack OVER a broiler pan) Now-a-days I'm a little wiser, & a little older (crap, I hate how that happens), but I still occasionally run into a stumper.

Here are a couple of great examples! Take a look at these:


Let's start with the Zucchini Chips:

Photo: Low Carb Zucchini Oven Chips!! Better then Potato Chips ANY DAY!!

BACK BY POPULAR DEMAND!!!! PLESE SHARE to save 

Minutes to Prepare: 10
Minutes to Cook: 30
Number of Servings: 4

Ingredients

1/4 cup ground almonds
1/4 cup grated fresh Parmesan cheese
1/4 t seasoned salt
1/4 t garlic powder
1/8 t black pepper
2 T fat-free milk


2 1/2 cups (1/4 inch-thick) slices zucchini (about 2 small)
Cooking spray

Directions

Preheat oven to 425.
Combine first 5 ingredients in a medium bowl, stirring with a whisk. Place milk in a shallow bowl. Dip zucchini slices in milk, and dredge in dry mixture. Place coated slices on an oven proof wire rack coated with cooking spray; place rack on a baking sheet. Bake at 425 for 30 minutes or until browned and crisp. Serve immediately.

Number of Servings: 4


===>> Feel Free To Add Me As A Friend!!! <<===
Don't forget to share so it will save to your page
This LOOKS beautiful right?

This is a recipe found on face book & “shared” to my page by my sister. She was thinking, “Tricia has butt loads of zucchini! This’ll be great for her!” Great idea, but let me just show you how this worked out. The recipe could NEVER have been tested. First off, when you begin dipping the zucchini disks in the milk, then the dry mix, you realize the dry mix does not stick to the zucchini! So that's got me ticked off already. Then, after 2 or 3 times of trying to get the mix to stick, the dry mix is not longer dry! It is a wet, lumpy mess. Load of crap.

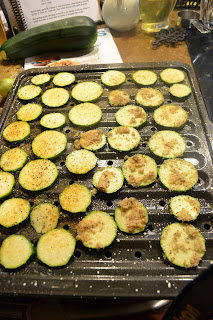
Since I couldn’t use the lump of wet dry mix anymore, I just sprinkled the rest of the disks with the spices - those are on the left, the “breaded” ones are on the right.
 
Then the recipe says to place the “breaded” disks on a rack over a cookie sheet. Um, who has an oven proof rack in their kitchen? Really, I want a vote here. So I did the best I could, I used a broiler pan. If that’s not enough, once they are baked (not for the 30 minutes the recipe calls for, but 20 - because they would have been burned to a crisp if I had left them in there any longer). But coming out of the oven, I kind of had my hopes up. Looks ok right?


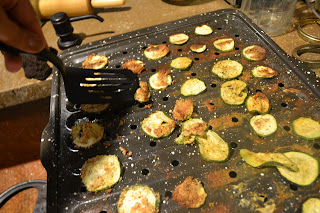
But no. This is what happened when I tried to get them off the pan.
The "chips" were not chips. They were soft, mushy circles of zucchini.

The author of this recipe might say, “That’s because you didn’t use a rack.” In my head I hear that in a snitty, Nurse Ratchet type voice. But I’m sorry, I know a fair amount about cooking, & before I even started this one, I had my doubts. There is no way you’re going to get a water-filled, ¼” piece of zucchini to crisp up like it is in the picture, in an oven.

All that being said, this recipe was a flop, no, I think an intentional cookery misguidance! I know most of what I see on the internet is a load of crap, but recipes? Really? So here is the recipe as I intend to try it next time - a labor of love! Correcting recipe blunders & boo-yaas is my passion.


ZUCCHINI CHIPS

2 cups Zucchini - cut in ¼” coins
¼ cup ground Almonds
¼ cup parmesan cheese - grated
¼ tsp. Seasoned Salt
¼ tsp. Garlic Powder
1/8 tsp. Pepper
2 tblsp. Milk

Oil - about a ¼” in a skillet

The almonds give this a great flavor (from what I could tell by the soft pieces I was able to scrape off the pan), but I think they were part of the problem in getting the mix to stick. So I plan to grind them very fine in my food processor, then set them out on a paper towel overnight to dry. I plan to do the same with the cheese - grate it & set it out to dry on a paper towel.
 
Mix almonds, cheese & seasonings in a small bowl (use your fingers, works best). Place them in an empty spice jar (or try a mesh sieve or flour sifter). Give the zucchini coins a dunk in the milk & lay them out on some waxed paper. Sprinkle the spice mixture on them. Move each zucchini coin to another piece of waxed paper, flipping it over on the way, then sprinkle that side with the spice mix.

Heat the oil in a skillet over medium heat & lay the zucchini chips in, one layer at a time, turning them once, until they are crispy & lightly browned. I know, I hate frying anything, but this is the only way I can imagine they got the picture to look like that, & that looks YUMMYY!

Place the chips in a paper towel lined basket, sprinkling with just a little more spice mix while they’re still warm. Repeat with remaining zucchini coins.

Now remember, this recipe is still in the “test” phase, so don’t plan to make this for company yet! Wait ‘til I’ve got the thing figured out.

                                                  ______________________________


Ok, now on to the Butter Cake recipe:
 
 
I can see how this recipe has the potential to be great. Kind of like a Lemon Bar, but butter flavored. Mmmm. And seriously, any cake that has so much butter in it, that the word "butter" has to go into its name? Gotta get me some-a-that!
 
But right from the get go, I had my complaints. It's hard to tell in this picture, but the ingredients are listed within the instructions, & this is a pain in the ars. I tried to figure out how much butter to set out to soften, yup, pain in the ars. Past that, the recipe calls for a 9"x 9" cake pan. Sorry, but 90% of people don't have one of those & will do what I did: use the 8"x 8" pan you do have. This created an issue with baking temperature & time. But that's pretty easy to adjust. And, other than that, it turned out ok & tasted like a sweet little bit of heaven.

So this is a picture of how it turned out this time:
 
A little too thick & overdone edges with an underdone middle. But these things I can fix.


And this is the recipe as it should have been written

BUTTER CAKE

Crust:
1 cup Flour
3 tblsp. Sugar
1/4 cup ground Almonds (I added this to the original recipe)
1/3 cup Butter - softened

Mix flour, sugar & almonds, & use a pastry knife to cut in butter until you have fine crumbs. Pat this into an 8"x 8" cake pan (I'm going to try doubling the whole recipe & making it in a 9"x 13" pan).


Cake:
1/2 cup Sugar
1/2 cup Powdered Sugar (the original recipe is just regular
3/4 cup Butter                         sugar, but it gave the cake a gritty texture I didn't
1/4 cup Light Corn Syrup         necessarily like, but you need some of the regular sugar
1 Egg                                        because its sharp edges cut the butter properly so that
1 cup Flour                                the batter doesn't end up super curdled)
2/3 cup Evaporated Milk - I'm thinking you could just use regular milk here too

Cream the sugars & butter, add the corn syrup & egg, mixing just until combined. Add the flour & milk, alternating a little of each at a time, mixing between additions. This will leave you with a slightly curdled look to the batter, that's ok. Pour it onto the crust & bake it at 300 for about 50 minutes.

Again, remember this is still in the "test" stage, but I'm thinking this one is definitely worth working on.


____________________________


Now, here's my request to you!

If you have a recipe that has perplexed you, left you hanging on some issue, or just ticked you off completely, HAND IT OVER! Let me take a whack at it & see if I can come up with something that really does work!


Saturday, July 27, 2013

LET'S TALK PESTO!

Visit the Mama Szasz website for more!

Pesto - dinner in about 10 minutes. I usually toast all of my pine nuts as I buy them, since almost all recipes ask you to toast them anyway - raw pine nuts will give you a belly ache. So, with that done, you can whip up a pesto faster than you can cook the noodles! Fast dinner! And easy-peasy.


For information on planting, growing & harvesting Basil, click this link to view the gardening page of my website. Mama Szasz Gardening Tips


FRESH BASIL PESTO

4 cups fresh Basil Leaves
3 Garlic Cloves
½ cup Pine Nuts - toasted
½ cup Parmesan Cheese - grated
½ cup Olive Oil
Salt to taste

To toast the pine nuts, place them on a sheet of tin foil & bake them for 4 minutes at 400. I use my toaster oven, just hate heating up a big oven just for this little bit. Let them cool completely before you mix them with the basil.
 
Blend basil, garlic, pine nuts & cheese (I didn't have any parmesan, so I used the hard gruyere, & it was great too) in a food processor, scraping down the edges as necessary. While the blade is running, drizzle in olive oil.

Add the salt & toss the pesto with some pasta - voila! Dinner’s done. And this is MY recipe, tried & true, so no worries - cook on with no fear!


Variation: I happen to have some fresh mozzarella in the frig & tomatoes flying out of my garden with wreckless abandon, so I’m dressing it up a bit. I’m chopping 2 tomatoes & a ball of the mozzarella, & setting them on top of the pesto pasta just before serving (add a little extra salt if you‘re a salt freak like me).

If you’ve ever had a Tomato/Mozzarella/Basil Salad - try this! Holy moly!


What to do with the pesto if you have a garden that goes a little basil crazy:
Usually at the end of the season, I end up with more basil than I know what to do with, so I make loads of Pesto. You only use small amounts of Pesto at a time, so I put it in ice cube trays & freeze them:
Once they’re frozen in cubes, I put those cubes in a big zip lock baggie & keep that in the freezer, using the cubes as I need them: on pasta, in soups, or in a few yummy recipes I’ll post below.
(I have not yet tried these recipes, but they look interesting enough to give a whirl)

CREAMY PESTO DIP
8 oz. cream cheese
1/4 cup milk
3 tblsp. pesto
Mix, beat until smooth & serve with pita chips

PESTO EGG SCRAMBLE
8 eggs
1/4 cup goat cheese
salt to taste
3 tblsp. pesto
Whisk the eggs, cheese & salt, scramble in a buttered skillet until set. Top with the pesto & serve.

COLD PESTO PASTA SALAD
1/4 cup lemon juice
3 tblsp. pesto
2 tblsp. mayonnaise
Blend all ingredients well & toss with cooked, cooled pasta (elbow or cavatappi or . . . )


I also have Perilla (Wild Japanese Basil) growing uncontrollably all over my yard, so I'll post a recipe for Perilla Pesto below, in case you have any of these beauties in your yard too:


PERILLA PESTO


When I first moved into my house here in Missouri, I found this crazy purple plant growing all over my yard! I just kept pulling it & pulling it, like a weed! Derr. Come to find out, it's a yummy Japanese Basil called Perilla! One of the many good finds at my house!

4 cups fresh Perilla leaves
1/3 cup pine nuts - toasted
2 garlic cloves
1 tsp. salt
1/2 cup olive oil
Parmesan cheese - in fat shreds
Kalamata olives

Combine first 4 ingredients in food processor until well ground &, while the blade is running, drizzle in the olive oil.

Toss this with some pasta & serve with a little parmesan & a few kalamata olives on top. This Pesto definitely has more "meat" to it, a heavy kind of nutty flavor, a little strong, so serve it with a really simple salad. Maybe just lettuce, cucumber & tomato with just salt, pepper & a little vinegar & oil. This gives a fresh, light compliment to the boldness of this Pesto.


Thursday, July 25, 2013

IT WAS ALGERIAN FOR DINNER LAST NIGHT . . . Prepared by a Yooper, for her Hungarian Husband. Huh?

Visit the Mama Szasz website for more!

Well, we're getting a little tired of the zucchini around the Szasz house, so I gave it a rest last night & went Algerian! Oh my! Fabulous stuff! My husband is not big on spicy, so I chose the Sweet Curry, but I've made this with the Spicy Curry too & if you like to go hot, this dish is a sock knocker!

A little prep time here, so put on the Jack Johnson, open a bottle of dark, peppery, red wine - might I suggest a Malbec? Yummers. Now hang on to your socks, 'cause here we go!

On the Menu:
                       Curried Chicken (Easy to turn veggie)

                       Algerian Flatbread

                       Creamy Cucumber Mint Salad (only if you're going with the Spicy Curry)


Preparation starts with:
Algerian Flatbread


                   3 cups wheat flour (you can also use some fun Indian or African flour,
                                             if you can find it at your local whole foods / organic type store)
                   2 tsp. dry active yeast (or a cube of fresh yeast if you can find it)
                   1 tsp. salt
                   3/4 cup olive oil - divided
                   1 ½ cups water
                   2 tsp. cumin
                   2 tsp. paprika
                   2tsp. turmeric
                  1/2 cup fresh mint - chopped

In a mixer with a dough hook (you're suppose to do this by hand, but I'm waaay too lazy for that), mix flour, yeast, salt & 2 tblsp. of the oil. While it's running, slowly add the water until a soft ball forms.


Let the dough hook run for about 15 minutes
(or hand knead it if you've got the need to torture yourself).

During this 15 minute wait, you can mix the remaining oil (saving just a little to rub the dough with later), cumin, paprika, turmeric & mint in a bowl & set it aside. If you like the spicy stuff, you can add even a little spicy curry to this mixture - fabulous!

Then, after the 15 minutes is up, remove the dough bowl from the mixer, use your hands to cover the dough ball with the last of the olive oil, cover the bowl with a towel & let it rest for about an hour.

While you're waiting for the dough to rest:
You should decide if you're going spicy or sweet on the curry. If you're thinking the sweet is more up your alley, skip the Cucumber Salad. It just adds more sweet & yummy on top of sweet & yummy. Not enough contrast. But if you're the hot & spicy kind, the Cucumber Salad will give you a super cool off between bites of the Curried Chicken! So, in this time space, you can make the Salad.

 
Creamy Cucumber Mint Salad


                                            1 or 2 cucumbers - peeled and sliced thinly
                                            1/2 cup yogurt
                                            2 garlic cloves - minced
                                            pinch of salt & pepper
                                            handful of mint - chopped

Mix the yogurt with the garlic, salt & pepper to taste. Pour this over the cucumber, sprinkle the mint on top & put it in the frig to chill. Toss the salad before serving.

Now change the CD to maybe some Adele, refill your glass with wine & sit down with a good magazine for a while. Never forget the most important part of any recipe: Good food comes from happy cooks!


OK, now back to the Algerian Flatbread:

After it has had a good rest, divide the dough into 10 balls. Flatten one ball with a rolling pin on a lightly floured surface (keeping the others covered with a towel) into a 9" disk, & spread a big ol' tblsp. of the oil/spice mix on it.


Roll this into a long cylinder
 
& wind that into a coil.
Set this aside (keep covered with a towel) & repeat this with the remaining dough balls.
 
On a lightly floured surface, roll each of these coils into 6" disks.
 
Set them aside, layering between parchment or waxed paper. Let these sit while you refill your glass & work on the main course for a while.


Curried Chicken


                                 2-3 chicken breasts (you'll be amazed at how good
                                                                         tofu is instead, if you're a veggie)
                                1/4 cup flour
                                1 tblsp. Sweet Curry (or as much as you dare of the Spicy)
                                1 tsp. salt
                                pinch of pepper
                                1/4 cup butter
                                1/2 cup onion - big chunks
                                1 tblsp. fresh ginger - minced
                                1/2 cup golden raisins
                                1/2 cup frozen peas (if you use fresh, soak them in water
                                                                                                  the night before)
                                1 1/2 cups rice - cooked al dente
                                2 cups chicken broth (or vegetable broth)
                                1 cup coconut milk (you can find it in the "Ethnic" food isle
                                                                 at your grocery store - by the water chestnuts)

Cut the chicken (or tofu) into 1" cubes. Place the flour, curry, salt, & pepper in a large baggie. Shake it up, add the chicken cubes & do the hokey-pokey. Heat the butter in a large skillet over med/high heat & brown the chicken on all sides (about 5 minutes).

If you're going with the tofu, remove it from the pan at this point & set it aside until about the last 10 minutes of the 45 minute simmer time below. Don't want mushy tofu, do we?

Add the onion & ginger, stir & add the remaining ingredients, cover & simmer on low for 45 minutes.


Final step for the Flatbread:
Heat a large skillet (dry) over medium heat (my cooktop needs one notch above medium), place the bread disk into the hot pan, turning once until puffed & browned in spots, about 3-4 minutes total.

Place them on a plate as you go, covering them with a towel. When they're all done, put them in a warm place until ready to serve.

Now sit down & relax for a while since the chicken isn't done yet. OR, if you're like me, get the laundry into the dryer, clean up the flour mess on your counter, sweep the dog hair off the kitchen floor & set the table.


Now you're ready to serve it all up! Enjoy!
 
(Oh, & don't forget the salad in the frig. :)

Tuesday, July 23, 2013

BREAD & BUTTER PICKLES . . . . . . . Save The Pickles!! A Lesson In The Lost Art of Canning

Visit the Mama Szasz website for more!

A friend of mine, also a novice gardener, asked me to start my recipes a little further back. I think she meant in the preparation process - like starting with the gardening issues for the ingredients. So I figured this recipe would be perfect, since I think this one also goes a little further back in time.

Growing up I thought everyone's pantry contained a shelf full of these beauties! Only once I grew up & moved away, did I realize they only came from moms & grandmas who canned them. Canning isn't nearly as common as it use to be. So, in an effort to prevent this delight from falling away with time, let's see if we can bring it back from near extinction.


For information on planting, growing & harvesting Cucumbers & Onions, click this link to view the gardening page of my website. Mama Szasz Gardening Tips 


                                              BREAD & BUTTER PICKLES
 
                                              3 lb. cucumbers (you can also use green tomatoes)
                                              1/3 cup salt (kosher or sea salt - they won't turn the juice milky)
                                              1/2 lb. onions (white or yellow) - sliced in rounds
                                              2 cups cider vinegar
                                              1 & 2/3 cup sugar
                                              1 tsp. celery seed
                                              2 tsp. ginger
                                              1/4 tsp. turmeric
                                              1/8 tsp. mace
 
If using green tomatoes, choose smooth, even-sized tomatoes that have acquired a white-ish color which happens just before ripening.
 
Then, try to pick your cucumbers early, before they get fat & white-ish. The length of the cucumber will vary, depending on the type you plant, but try to get them when they are 1" - 2" in diameter. Wash, remove stem & blossom scar, then cut into 1/2" rounds (1/4" rounds for green tomatoes).
 
 
 Place in a bowl (not metal), sprinkle with salt,
 
Add the water & mix it up with your hands.
Cover this with a plate & let it sit for about 24 hours.
 
 
THE NEXT DAY
 
                           Get prepared for canning. You'll need:
                                             5 or 6 pint mason jars, with lids & rings
                                             A big pot that will fit all the jars covered with water
                                             Something to reach into the hot water with - salad tongs work
                                             Fill that pot with water & start heating it - takes a while
                                             Wash the mason jars - then dunk them in boiling water
                                                                                                                for about 15 seconds.
 
Pour the cucumbers into a strainer & let drain for about 15 minutes.
 
While they're draining, slice the onions.
 
Place the cucumbers, onions, vinegar, sugar & spices in a pot.

 
Stir & simmer this for about 15 minutes.
Ladle this into your mason jars, this may take some pushing & re-arranging. Don't cram the cucumbers in, but don't leave extra wasted space. Pouring remaining juices over them until they are full to about 1/2" from the top.
 
 
If it happens that there isn't quite enough juice to do this, add a little more cider vinegar to each jar.
 
 
Dunk your lids & rings in boiling water for about 15 seconds, & put them on the jars. Screw them on to finger tight, & set them in the pot of boiling water.
Make sure the jars are completely covered with water & let them boil for 15 minutes.
 
Remove the jars from the water, placing them on a towel or hot pads, or something of the sort. Then cover them with another towel & let them cool.
 
This is the fun part: now wait to hear the little puppies *pop*, & you know they're sealed well. You can test this after they've cooled, by pressing down on the center of the lid with your finger. If it still pops up & down, it's not sealed. That's ok though. If one or two don't seal, just keep them in the frig & eat them within the next couple weeks. The others can get labeled & go in the pantry.


Sunday, July 21, 2013

Did Someone Say SURPRISE APPLE CRISP?!

Visit the Mama Szasz website for more!

So, my plan for today was to prepare a crepe demonstration, but getting 10 minutes alone in my house to shoot a segment is kind of difficult. Especially if you don't want to hear, "Hey mom, I'm hungry," a hundred times or catch a glimpse of my brother wandering through the kitchen in his underpants. So, that piece will have to wait.

For now, I'm still trying to get rid of the butt loads of zucchini my garden is producing this year! Seriously! I raid my garden every morning before the sun starts baking Missouri to a scorching 187 degrees! So how is it, that I can pick all the zucchini I can find one morning, & still find a 300 pound whopper in the garden the very next morning?! Ok, maybe I tend to exaggerate a little, but you get the picture.

So today, I put together Susanna's Surprise Apple Crisp. What makes it such a Surprise, you say? Well, because my sister, Susanna's, husband HATES zucchini - or so he thinks. Every year she makes this for him because he loves apple crisp. The surprise comes into play because, every year, he eats it up & has no idea it's made with zucchini!  You, & any little zucchini haters you might have scattered around your house, won't be able to tell either!

At my house, by the end of July, I'm getting comments like, "Enough with the zucchini everything mom!" So I have to get creative if I intend to use up all of the sustenance our gardens supply & avoid an all out revolt from my family as well.

Thus, I fall back on old favorites, like . . .


SUSANNA'S SURPRISE APPLE CRISP
 

                                                3 cups flour
                                                2 cups sugar - divided
                                                3/4 cup brown sugar
                                                3/4 cup butter - softened
                                                8 cups zucchini - peeled, de-seeded & chopped (see below)
                                                3/4 cup lemon juice - bottled or fresh
                                                1/2 tsp. nutmeg
                                                2 tsp. cinnamon - divided
 
Using a pastry knife, combine flour, 3/4 cup of the sugar, brown sugar & butter. Pat, don't press, into the bottom of a 9x13 cake pan, & bake at 350 for 10 minutes.
 
Now chopping the zucchini is part of the trick here. Cut the ends off, cut it in half lengthwise & dig the seedy middle section out with a spoon (& feed that to the chickens if you've got 'em). Then cut the halves into long, triangular sections & chop those into apple chunk looking pieces.
 
 
Voila! Zucchini that looks like cut up apples.
 
Cook these in the lemon juice, over medium heat for about 15 minutes, 'til they're tender.
 
 
Add nutmeg, 1 cup of the sugar & 1 tsp. of the cinnamon. Stir this until the sugar dissolves, about 5 minutes. At this point the sauce is very liquidy, it's ok, it's suppose to be. Just pour it over the baked crust & bake this another 30 minutes, still at 350.
 
Mix remaining 1/4 cup of sugar & 1 tsp. of cinnamon, sprinkle this over the top & bake 5 minutes longer.
 
I serve it warm with a big glob of vanilla bean ice cream. Yummmmers!


Here's a great gift idea too:


Mix together the crust ingredients & put them in one jar. Then prepare the zucchini mixture up to the point where you are ready to pour it onto the crust, but put that in another jar instead. Put the lids on the zucchini jars & boil them (just the zucchini jars, NOT the dry ingredient jars), submerged, in a hot water bath for 10 minutes. (And don't get the idea that I make comments like that, about not boiling the dry ingredient jar, because I think you are an idiot. I do that because I know what an idiot I have been about recipes sometimes!)
 
Then just dress up the jars & add a label with the following instructions & give away!
 
Dry Ingredient Jar Instructions:
Using a pastry knife, cut 3/4 cup of butter into contents of this jar. Pat, don't press, into a 9x13 cake pan & bake at 350 for 10 minutes.
 
Zucchini Jar Instructions:
Pour onto baked crust & bake at 350 for 30 minutes. Sprinkle with some cinnamon sugar & bake 5 minutes longer.  Serve with vanilla bean ice cream.


Thanks y'all for sticking with me & as always,
Cook It, Share It, LOVE It!